Legoaizer -
Help Legoaizer -
Help |
Legoaizer -
Help
From scratch
Creating a new colour brick dataset from
scratch In some
cases you have special colours in mind and deviating bricks, which are not found
in the Bricklink database which is installed in Legoaizer. In such a case you
like to create your own dataset with colours and bricks. There is one way of
doing it, starting from a Bricklink database, and then exit, but this will very
likely fail, since the input format is very sensitive to errors. We have
now provided a very easy way to create a new dataset from scratch.
You can the new data set interface from the Main Menu > 'Colour table' > 'New colour/brick
table'. This will open a very simple interface
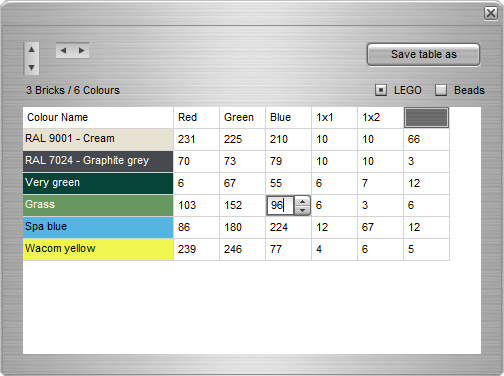
with just a few controls: The two
little arrows on the left indicate the size of the table. It starts by default
with 2 colours and 2 bricks (1x1 and 1x2 studs). These arrows will increase or
decrease the amount of colours and bricks. The two radio buttons on the right indicate what
kind of table you want to create: a (lego) brick table or a Beads table. The only
difference is that in a Beads table only one type of brick is allowed: 1x1. When
you try to create a Beads table with more than one brick it will warn
you. The table
in the window has 5 fixed columns: the 'Colour
Name' (double click and type the colour name), the 'Red', 'Green' and 'Blue' colour parameters (in bytes =
value from 0 to
255), and at least one brick size. More bricks are possible, more colours as well.
There is no limit to the size of the table. Perhaps a practical size will hamper
you a bit. The values under the brick reflect the cost of each brick-colour
combination, and must be in the same value range as the one that is currently
active in your application (menu > 'Preferences'
> 'Other settings' > 'Currency x 100' ). The brick sizes must be
unique (errors may occur when you have identical brick sizes), and always start
with the lowest amount of studs (so: 1x2 and not 2x1). To set a colour value a
simple spin edit will show in the cell you select, as shown in the example picture
below. You can use the up-down arrows to quickly set the value, or type in number between
0 and 255.
When you
are ready make sure all the brick values are available, and the brick names on
top of the values are correct. Only the column that has a brick value (or
rather: no text found) is taken as a table value. Then press the 'Save table as' button and provide a
name of the file. The file extension is always .xml, and there is no need to
provide it (automatically done). The table is not automatically active, only
passively saved. To change your data table, follow the usual approach (from
the main menu: 'Colour table' > 'Open table'
). Only when the table is found valid the new table will become
active.![]()